3D Printing
3D printing is one of the niche hobbies I have that led me to pursue CG when I was younger. Take a look at my 3D prints below!

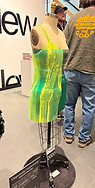
Computer Parts Dress 2026
I teamed up with Devin Carrigan, who wanted to create a dress that resembled the Y2K clear technology of the time. Devin created all the inner parts of the dress and submitted files to print. While I created the parts of the dress in 3D to ensure they were print-ready. The original model of the dress was created by Najdmie on CGTrader. Printed using a Bambu 3D printer
1. Sizing
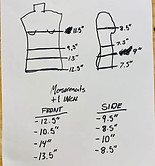


Due to time constraints for printing, Devin decided to buy a finished model that I could just modify. He bought the original dress model from Najdmie on CGTrader. Once I had the measurements, I began to resize the model to fit the mannequin's dimensions in Maya. We decided to add an additional inch all around to account for the parts Devin would be building underneath the 3D portion.
With the exact measurements in place, I began to reconnect all the pieces I had separated. I used ZBrush to smooth out the folds where they were being reattached. I also increased the size of the strap to make it more durable.
Photo cred: Devin
2. Cutting it up!

With the dress now sized, I began separating the parts so they could fit on the 3D Printer. The measurements had to be 8.5 x 8.5 x 8.5. So I measured once again to make sure each part I separated would fit within these restrictions. I also kept in mind the assembly aspect, as Devin wanted to be able to screw the pieces together. So we decided that the front and back halves of the dress would be attached via screws. The front and back would attach together via a 3D printed curved T attachment that I would create to be already attached to each part.
3. Test Print!
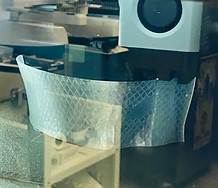
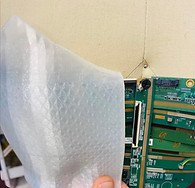
Since it was my first ever print on this scale with this type of printer, the translucency of the print needs to be checked. We did a test print! It was good to see that when sending the files over to Devin, they worked and were printable. It was also downscaled to print faster, so it gave a good idea of how long each print would actually take full size.
4. Making the Attatchments


Now I needed to figure out how to connect the 24 pieces I just made. I made the "screw" attachment to fit a 1/4 of an inch bolt and a half-inch in length. The goal was to make it as small as possible while making sure the size was available at our local Home Depot. Additionally, each attachment was .7 cm to ensure it would fit against the mannequin and not stick out.
5. Adding the attachments to the Dress
Then I went by and added each attachment to every single piece, ensuring they lined up with each other so there would not be any gaps. In total, there were about 208 attachments.
6. Printing the Dress!
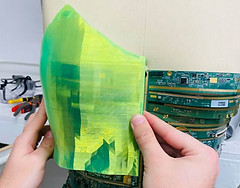

Finally, the dress could be printed. Each piece was separated into its own file and converted to an STL. Each part took 10 hours to print. There was a change in the deadline. So the new plan was to print only the Right side so you can see the inside parts and make it a half dress.
Chiquito Figure
Model by: Lesley Marroquin
Printed by: Sam Holovacs

